A Slightly Longer Piece On The VM/Docker/k8s Manager/Orchestrator Alternative for macOS;
As the subtitle may suggest, a sizable chunk of this Drop is macOS-specific. But, there are some bits at the end that aren’t, which include two ways to publish Observable Framework (or any set of files in a directory) via containers.
There’s A Little Old App Where Containers & VMs Get Together

I’ve been using OrbStack (I’m just gonna call it ‘Orb’ from now on) since the first alphas and have been promising to, some day, do a longer piece on it ever since. Today, is that day.
The short version is that Orb is a full-on replacement for Docker Desktop (or the FOSS alternatives) and VM managers like QEMU, VirtualBox, VMware Fusion, Parallels, etc. On top of that, it also provides a local Kubernetes cluster (disabled by default, and I won’t be covering that, today).
Here’s their bullet pitch for why you should try it:
- Instant startup
- Fast network
- Local domain names
- Seamless integration
- Linux machines
- Rosetta x86 emulation
- Optimized for Apple Silicon
- Low CPU usage
- Dynamic disk
- Native Swift app
- SSH agent forwarding
- File sharing
- 2-way CLI integration
- 15 Linux distros
- SSH
- Remote VS Code
- VPN-friendly
- IPv6
- ICMP
- Ping
- Traceroute
- Low initial memory usage
- Accurate clock
- Works without admin
- Bind mounts
- Volume files on Mac
- Image files on Mac
- Host networking
- eBPF support
- Native UI
Rather than repeat the remaining marketing material on their site, let me describe some of the ways I use it and why I think it beats whatever VM/container combo I’ve been using on Macs over the years.
When I test new frameworks, apps, CLIs, etc. to see if they do what they say on the tin, I usually do so in an Orb sandbox, unless they’re macOS-specific. I generally do that in a VM vs. container, and one neat feature of Orb that makes this painless is Orb’s support for cloud-init. For those not familiar with cloud-init, it’s just a YAML (ugh) file with various sections that let you have it auto-configure the system to your liking. In less than two minutes, I can have a modern Ubuntu VM up and running. Here’s one of my basic/generic cloud-init files:
#cloud-config

groups:
  - admingroup: [root]
  - cloud-users

# install packages I tend to need across most projects
packages:
 - build-essential
 - libcurl4-gnutls-dev
 - libxml2-dev
 - libssl-dev
 - less
 - locales
 - vim
 - wget
 - ca-certificates
 - gnupg
 - bat
 - jq
 - git
 - curl
 - fd-find
 - ripgrep
 - pastebinit
 - unzip
 - r-base
 - r-base-dev
 - r-recommended
 - git-all

# run commands
runcmd:
# ensure work dirs are available
 - mkdir -p /run/dl /usr/local/bin
# make sane shortcuts for bat and fd
 - ln -s /usr/bin/batcat /usr/local/bin/bat
 - ln -s /usr/lib/cargo/bin/fd /usr/local/bin/fd
# install duckdb
 - wget -P /run/dl https://github.com/duckdb/duckdb/releases/download/v0.10.0/duckdb_cli-linux-aarch64.zip
 - unzip /run/dl/duckdb_cli-linux-aarch64.zip -d /run/dl
 - cp /run/dl/duckdb /usr/local/bin
# install tailscale
 - curl -fsSL https://tailscale.com/install.sh | sh
# install go
 - wget -P /run/dl https://go.dev/dl/go1.22.0.linux-arm64.tar.gz
 - rm -rf /usr/local/go
 - tar -C /usr/local -xzf /run/dl/go1.22.0.linux-arm64.tar.gz
 - echo 'export PATH="$PATH:/usr/local/go/bin"' >> /etc/profile.d/setup-go.sh
 - chmod 755 /etc/profile.d/*
# make the Rust, Deno, and nvm installers handy, if I need them
 - curl -o /run/dl/rustup.sh --proto '=https' --tlsv1.2 -sSf https://sh.rustup.rs
 - curl -o /run/dl/deno-install.sh -fsSL https://deno.land/install.sh
 - curl -o /run/dl/nvm-install.sh https://raw.githubusercontent.com/nvm-sh/nvm/v0.39.7/install.sh
 - chmod 755 /run/dl/*sh
That gets me R, git, jq, fd, ripgrep, duckdb, tailscale, and go, and sets me up to be able to install Rust, Deno, and nvm (Node Version Manager), and it takes almost no time:
$ time orb create -c basic-cloud-init.yml ubuntu:jammy drop-example
0.12s user 0.14s system 0% cpu 1:23.34 total
I have separate scripts for other userland setup, including this one which uses the installers the cloud-init YAML said to download:
#!/bin/bash

/run/dl/nvm-install.sh

export NVM_DIR="$HOME/.nvm"
[ -s "${NVM_DIR}/nvm.sh" ] && \. "${NVM_DIR}/nvm.sh"                   # This loads nvm
[ -s "${NVM_DIR}/bash_completion" ] && \. "${NVM_DIR}/bash_completion" # This loads nvm bash_completion

nvm install 20

nvm use 20

/run/dl/rustup.sh -y

source "${HOME}/.cargo/env"

/run/dl/deno-install.sh

echo 'export DENO_INSTALL="/home/hrbrmstr/.deno"' >>"${HOME}/.bashrc"
echo 'export DENO_INSTALL="/home/hrbrmstr/.deno"' >>"${HOME}/.profile"

echo 'export PATH="$DENO_INSTALL/bin:$PATH"' >>"${HOME}/.bashrc"
echo 'export PATH="$DENO_INSTALL/bin:$PATH"' >>"${HOME}/.profile"

echo 'export NVM_DIR="$HOME/.nvm"' >>"${HOME}/.bashrc"
echo '[ -s "${NVM_DIR}/nvm.sh" ] && \. "${NVM_DIR}/nvm.sh"' >>"${HOME}/.bashrc"
echo '[ -s "${NVM_DIR}/bash_completion" ] && \. "${NVM_DIR}/bash_completion"' >>"${HOME}/.bashrc"
That’s also a one-liner to install:
$ time orbctl run -m drop-example /Users/hrbrmstr/Documents/post-init-04.sh
0.02s user 0.03s system 0% cpu 40.914 total
That orbctl utility is super handy, as it lets you run anything inside any VM you have running. For example:
$ orbctl run -m drop-example go version
go version go1.22.0 linux/arm64

$ orb -m drop-example node --version # shorthand version
v20.11.1
Orb also installs some tooling inside the VMs it makes. A cool little utility that comes along for the ride is macctl:
$ macctl
Control and interact with macOS from OrbStack Linux distros.

The listed commands can be used with either "macctl" or "mac".

You can also prefix commands with "mac" to run them on macOS. For example:
    mac uname -a
will run "uname -a" on macOS, and is equivalent to:
    macctl run uname -a

Usage:
  macctl [command]

Available Commands:
  completion  Generate the autocompletion script for the specified shell
  help        Help about any command
  link        Link a command to macOS
  notify      Send a macOS notification
  pull        Copy files from macOS
  push        Copy files to macOS
  run         Run command on macOS
  unlink      Unlink a macOS command

Flags:
  -h, --help   help for macctl

Use "macctl [command] --help" for more information about a command.
While you could push or pull files, Orb also automounts /Users (and some other dirs), so I can go to my Drop’s iCloud folder in it and run linux commands over my files (which I’ve done in some previous Drops):
$ ssh drop-example@orb # this is how you get into the VMs/containers
$ cd "/Users/hrbrmstr/Library/Mobile Documents/com~apple~CloudDocs/Documents/substack/hrbrmstr-daily/2024/2024-02"
$ hrbrmstr@drop-example:/Users/hrbrmstr/Library/Mobile Documents/com~apple~CloudDocs/Documents/substack/hrbrmstr-daily/2024/2024-02$ ls
2024-02-01        2024-02-06  2024-02-09-01     2024-02-13  2024-02-18-bonus  2024-02-21
2024-02-02        2024-02-08  2024-02-12        2024-02-14  2024-02-19        2024-02-23
2024-02-05-bonus  2024-02-09  2024-02-12-bonus  2024-02-16  2024-02-20        2024-02-24
hrbrmstr@drop-example:/Users/hrbrmstr/Library/Mobile Documents/com~apple~CloudDocs/Documents/substack/hrbrmstr-daily/2024/2024-02$
This also means you can do web development on your Mac in a project folder and have immediate access to the same exact files (no “rsyncing”) in the VM. This is great for testing in the same environment your apps or analyses may run in.
It does this on the flip side as well, mounting all of the Linux filesystems (VMs and Docker) under ~/Linux:
$ ls -alrt ~/Linux/drop-example
total 3
drwxr-xr-x  1 root      wheel     0 Apr 18  2022 sys
drwxr-xr-x  1 root      wheel     0 Apr 18  2022 proc
drwxr-xr-x  1 root      wheel     0 Apr 18  2022 boot
lrwxrwxrwx  1 root      wheel     8 Feb 23 03:21 sbin -> usr/sbin
lrwxrwxrwx  1 root      wheel     7 Feb 23 03:21 lib -> usr/lib
lrwxrwxrwx  1 root      wheel     7 Feb 23 03:21 bin -> usr/bin
drwxr-xr-x  1 root      wheel    84 Feb 23 03:21 usr
drwxr-xr-x  1 root      wheel     0 Feb 23 03:21 srv
drwxr-xr-x  1 root      wheel     0 Feb 23 03:21 media
drwxrwxrwt  1 root      wheel     0 Feb 23 03:24 tmp
drwxr-xr-x  1 root      wheel     0 Feb 23 03:31 run
drwxr-xr-x  1 root      wheel     0 Feb 23 03:37 dev
drwxr-xr-x  1 root      wheel     0 Feb 25 03:36 private
drwxr-xr-x  1 root      wheel    28 Feb 25 03:36 opt
drwxr-xr-x  1 root      wheel     0 Feb 25 03:36 Volumes
drwxr-xr-x  1 root      wheel     0 Feb 25 03:36 Users
drwxr-xr-x  1 root      wheel     0 Feb 25 03:36 Library
drwxr-xr-x  1 root      wheel     0 Feb 25 03:36 Applications
drwxr-xr-x  1 root      wheel    96 Feb 25 03:37 var
drwx------  1 root      wheel    58 Feb 25 03:37 root
drwxr-xr-x  1 root      wheel    16 Feb 25 03:37 home
drwxr-xr-x  1 root      wheel    32 Feb 25 03:37 mnt
drwxr-xr-x  1 root      wheel  2608 Feb 25 03:37 etc
drwxr-xr-x  6 hrbrmstr  staff   200 Feb 25 03:56 ..
drwxr-xr-x  1 root      wheel   198 Feb 25 03:56 .
This also means you can use your Mac editors and tools to work on files only in the Linux environment.
I tend to use the arm64 version of everything these days, but Orb can run x86_64 VMs/containers as well.
Generally, I delete the VMs after using them, but that’s only because I come from the days of floppy disks and hate to waste storage space. I do keep at least one, robust Ubuntu VM running, so I can use any Linux-specific tools/apps that have no macOS counterpart. This include any X11 apps (which work super-fast in XQuartz given how close the X11 client and server are to each other).
Every Port’s Moving, Every Port’s Grooving, Baby
“Web services running in Orb are accessible via HTTPS by an orb.local [sub]domain name. No setup is required; Orb automatically sets up a reverse proxy with a local certificate authority and TLS certificates for each domain. This removes the need to generate, install, and trust self-signed certificates manually and configure a reverse proxy for each service, which can easily take hours.” (shamelessly copied from their site).
We just made drop-example and that comes with Apache httpd pre-setup. So, if I now go to http://drop-example.orb.local/, I’ll see the default page:

You can see all of the Orb reverse proxies at https://orb.local/.
Let’s see how that might work for us in a custom Docker setup.
The Whole Stack Shimmies
We recently showed off how to use Observable Framework to make a basic example report. Let’s look at two ways we can serve that up in Docker.
The first way will cause much angst in DevOps folks since we’ll be copying the report’s dist directory directly into the container, which will make it ultra-portable, but also means we need to regen the container for any updates to the report content. But, it means you can literally put the report server anywhere containers can be stood up.
Clone the drop-report repo, run npm run build, and put this Dockerfile in it:
FROM arm64v8/nginx:latest
COPY dist /usr/share/nginx/html
EXPOSE 80
Those four lines:
- Say to use the arm64 version of the latest nginx docker image. We’re using the arm64 version so it runs as fast as possible on Apple Silicon.
- Copies the built report over to the nginx default serving directory
- Exposes the nginx default port 80
We’ll build it, tagging this with both a 0.1.0 tag and latest tag:
$ docker build -t drop-report:0.1.0 -t drop-report:latest .
#…standard docker build output
and, then run it:
$ docker run -d -p 9191:80 --name report-runner drop-report
3106247725a187c609e41bf591549074f02e1e82583b52140bdb3915f48fca58
All the usual Docker CLI commands work, but we can also hit the Orb GUI:
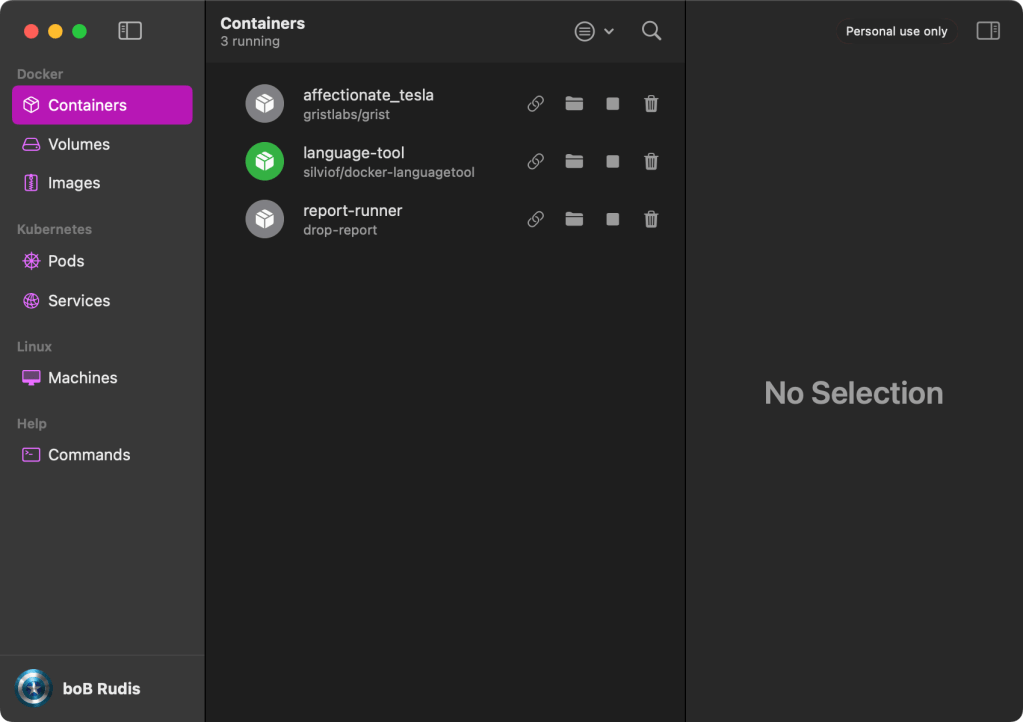
Tapping the folder-looking icon will open the running container’s volume in the Finder. Tapping the link icon will take us to https://report-runner.orb.local/ in the default system browser (you can also hit it on http://127.0.0.1:9191/).
Again, that’s not the recommended way to “container” dance, and all these services are local, meaning you can only access them on your Mac. We can make a more robust setup, that allows others to access the report server over Tailscale (no need to expose things needlessly to the entire LAN/internet) by using Docker Compose:
---
version: "3.7"
services:
# this sets up tailscale: https://tailscale.com/kb/1282/docker
  tailscale-nginx:
    image: tailscale/tailscale:latest
    platform: linux/arm64/v8
    hostname: tailscale-nginx
    environment:
      - TS_AUTHKEY=A-Really-Long-String-From-The-Tailscale-Console-2QcW7ps4wYoB
      - TS_STATE_DIR=/var/lib/tailscale
    volumes:
      - ${PWD}/tailscale-nginx/state:/var/lib/tailscale
      - /dev/net/tun:/dev/net/tun
    cap_add:
      - net_admin
      - sys_module
    restart: unless-stopped
# this sets up nginx
  nginx:
    image: arm64v8/nginx:latest
    platform: linux/arm64/v8
# this mounts the built Framework `dist` directory to the default nginx html dir
    volumes:
      - ./dist:/usr/share/nginx/html
    working_dir: /usr/share/nginx/html
    depends_on:
      - tailscale-nginx
    network_mode: service:tailscale-nginx
Put that into docker-compose.yml in the drop-report directory and run:
$ docker-compose up
#… *alot* of output
Hit the Orb GUI again so see this container/layers:
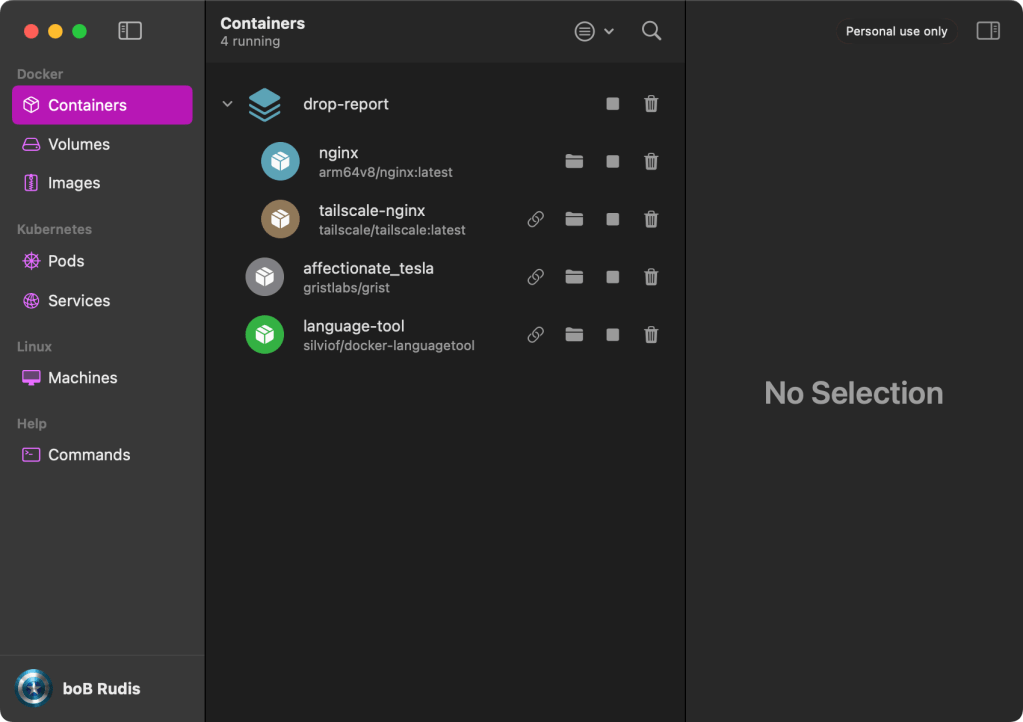
Now, you can still access this via https://tailscale-nginx.drop-report.orb.local/, and others in your tailnet (such as an app team or a client you want to show work to but not do so right on the icky internet) can go to the named tailnet node or IP: http://tailscale-nginx/.
FIN
There are tons more things in OrbStack we have not touched on, but they have excellent documentation, a vibrant community, and are also very responsive in GitHub issues.
Remember, you can follow and interact with the full text of The Daily Drop’s free posts on Mastodon via @dailydrop.hrbrmstr.dev@dailydrop.hrbrmstr.dev ☮️

Leave a comment