btop; ttyd; Homebrew Bundle; fastfetch
The first two sections were inspired by two recent needs to debug some things, which was just enough of an excuse to turn the phrase in the tagline. Y’all get a fourth section, today, since the third section is kind of macOS-specific.
btop

I was fighting a macOS system resource consumption issue (that was ultimately caused by Spotlight losing its mind) when I realized we’ve never covered btop.
This utility is a top alternative and functions as resource monitor that offers a comprehensive view of system performance metrics, including CPU, memory, disk, and network usage. It is a successor to bpytop, which was written in Python (btop is implemented in C++ for better performance and lower resource consumption).
It runs pretty much everywhere, has gorgeous themes, is much easier on the eyes than top, and provides a handy set of commands to machinate processes.
You can see a screencap of it in the next section’s header.
ttyd

We mentioned ttyd a while back, but never dug into it. I was reminded of this when I needed to show a mate how to do something and didn’t feel like needlessly firing up a Zoom or FaceTime session.
ttyd (GH) (Wiki) is a command-line tool that lets us share terminal sessions (from pretty much any OS) over the web. This tool is built on top of Libwebsockets and libuv, so connections are both fast and reliable. It integrates a fully-featured terminal based on Xterm.js.
On top of providing remote shell viewing and interaction, ttyd also has a graphical ZMODEM integration, which lets us also perform file transfers using the lrzsz protocol. If you bring your own certs, ttyd also supports TLS encryption based on OpenSSL. If you plan on sharing terminals over the big, bad, internet, you should 100% use that feature. Perhaps, also consider enabling the HTTP basic auth feature, too.
You aren’t limited to just sharing a shell prompt. ttyd can run any custom command with various options. The section header shows it displaying a btop session (I used this CLI incantation: ttyd --browser --port 9999 btop), and you can change up the port, network interface (perhaps consider only letting Tailscale/WireGuard nodes access the terminal session?), credentials, certificates, etc. on a per-session basis.
To share a working local terminal session, you can use tmux. On the system you’re sharing from do:
$ tmux new -A -s support_session
then — preferably in a separate tab/window/pane — do:
$ ttyd tmux attach -t shared_session
(use other config options as needed) and folks can see what you’re doing (that incantation uses the default port of 7681).
It’s super handy, especially in a low bandwidth context.
Homebrew Bundle

(Technically Homebrew also runs on Linux, but most folks will consider this a macOS-only section.)
Homebrew Bundle is a tool that gives us the superpower of bundling and installing multiple Homebrew packages on macOS systems. It provides a way to manage and install a consistent set of packages across different machines or environments.
The key features of Homebrew Bundle include:
- Creating a
Brewfilethat lists all the packages you want to install. This file can be version-controlled and shared across systems. - Installing all packages listed in the
Brewfilewith a single command:brew bundle. - Uninstalling packages not listed in the
Brewfilewithbrew bundle --force-uninstall. - Dumping all currently installed packages to a
Brewfilewithbrew bundle dump. - Checking for stale packages with
brew bundle check.
Homebrew Bundle simplifies the process of setting up a consistent development/wprking environment across multiple machines or team members. It ensures that all required packages are installed and helps avoid conflicts or missing dependencies. It can even manage/install apps from the Mac App Store, and also VS Code extensions.
It’s super handy, and I almost never see folks mention using it, so I thought today was as good as any other to close that gap. Just using brew bundle dump (consider adding --describe to that incantation) alone is handy to get a quick overview of what you’re using from Homebrew.
fastfetch
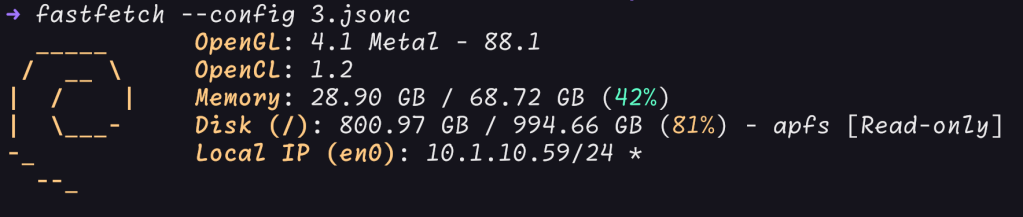
Since the previous section was kind of masOS-specific, here’s a quick, extra section on an improvement over the neofetch utility we covered in a previous Drop.
fastfetch can show the same things neofetch can, but it just does it faster since it’s written in a compiled language (C). It is highly configurable, and the config language is JSONC (i.e., JSON with support for comments!). Here’s an example config (the output is in the section header):
{
    "$schema": "https://github.com/fastfetch-cli/fastfetch/raw/dev/doc/json_schema.json",
    "logo": "debian_small",
    "display": {
        "binaryPrefix": "si"
    },
    "modules": [
        "vulkan",
        "opengl",
        "opencl",
        "memory",
        {
            "type": "disk",
            "folders": "/:/home:/boot:/efi"
        },
        "localip"
    ]
}
If you do use neofetch you should strongly consider switching to fastfetch.
FIN
Remember, you can follow and interact with the full text of The Daily Drop’s free posts on Mastodon via @dailydrop.hrbrmstr.dev@dailydrop.hrbrmstr.dev ☮️

Leave a comment